Sunday, November 10, 2013

HACK- Candy Crush Saga v1.xx.0 (Multi Mods) – Android


This hack is for Candy Crush Saga  on android devices. This hack uses the Install Hacked APK method.


Hack Features:
Many different depending on file.

Instructions:
  1. Download the zip file provided at the bottom of the page.
  2. Extract the file.
  3. Transfer the APK file onto your device (preferably SD card in /sdcard/download/)
  4. Use a file explorer to navigate to the location of the saved APK (Should be /sdcard/download/)
  5. Click the APK and select install.
  6. Launch the game.
  7. Enjoy
NOTE! If you are having Facebook connections follow the instructions below:
  1. Uninstall original Candy Crush.
  2. Go into your Facebook account settings.
  3. Go to your app settings
  4. Remove Candy Crush
  5. Install modded APK
  6. Launch game and connect to Facebook

Hack:

Candy Crush Saga v1.28.0


source from: http://www.ugeeko.com/

Tuesday, March 5, 2013

Android Location Based Services Application – GPS location

With the incorporation of GPS devices in smartphones, Location Based Services (LBS) have become pretty hot the past few years. The iPhone was the first to give a huge boost to this kind of applications and now Android continues on the same path. In this tutorial, I will show you how to build your first LBS application for Android. The first step is retrieving the user’s current location and then using his coordinates to provide data for that location.
In general, the user’s pinpointing on the map is feasible in one of the following ways:
  1. Using the GPS device that comes with the mobile
  2. Using the ID of the Cell that the user is currently served by
The first one is much easier and more accurate (since the second provides only an approximation). Since these days a big number of phones do have GPS devices onboard, we will use the first way. The Android SDK’s emulator can emulate changes in the user’s location and provide dummy data for his coordinates.
Let’s get started by creating a new Android Project in Eclipse. I gave it the fancy name “AndroidLbsGeocodingProject” and used the properties as shown in the following image:
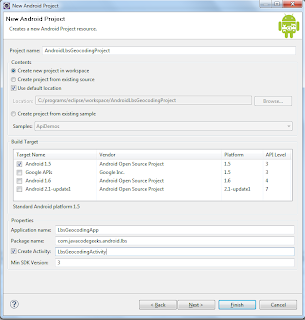
Note that I used the Android 1.5 platform version and “3” as the SDK’s min version. The application is not going to use any of the new super-duper APIs, so I decided to go with one of the first versions for backwards compatibility. It is generally a good idea to support as many versions as possible. You can find information regarding the platform versions and their corresponding market share here.
To start with, we will only add a button which will trigger the retrieval of the current location’s coordinates from a location provider. Thus, the “main.xml” file for the application’s interface will be as simple as this:
01<?xml version="1.0" encoding="utf-8"?>
02<LinearLayout xmlns:android="http://schemas.android.com/apk/res/android"
03    android:orientation="vertical"
04    android:layout_width="fill_parent"
05    android:layout_height="fill_parent"
06    >
07<Button
08 android:id="@+id/retrieve_location_button"
09 android:text="Retrieve Location"
10 android:layout_width="wrap_content"
11 android:layout_height="wrap_content"
12 />
13</LinearLayout>
In order to get started with the location capabilities of the Android API, the first step is to take reference of the LocationManager class, which provides access to the system location services. This is done via the getSystemService of our activity (actually it inherits it from the Context parent class). Then, we request updates of the device’s location using the method requestLocationUpdates. In that method, we provide the name of the preferred location provider (in our case GPS), the minimum time interval for notifications (in milliseconds), the minimum distance interval for notifications (in meters) and finally a class implementing the LocationListener interface. That interface declares methods for handling changes in the user’s location as well as changes in the location provider’s status. All the above can be translated into code as below:
01package com.javacodegeeks.android.lbs;
02
03import android.app.Activity;
04import android.content.Context;
05import android.location.Location;
06import android.location.LocationListener;
07import android.location.LocationManager;
08import android.os.Bundle;
09import android.view.View;
10import android.view.View.OnClickListener;
11import android.widget.Button;
12import android.widget.Toast;
13
14public class LbsGeocodingActivity extends Activity {
15     
16    private static final long MINIMUM_DISTANCE_CHANGE_FOR_UPDATES = 1; // in Meters
17    private static final long MINIMUM_TIME_BETWEEN_UPDATES = 1000; // in Milliseconds
18     
19    protected LocationManager locationManager;
20     
21    protected Button retrieveLocationButton;
22     
23    @Override
24    public void onCreate(Bundle savedInstanceState) {
25         
26        super.onCreate(savedInstanceState);
27        setContentView(R.layout.main);
28
29        retrieveLocationButton = (Button) findViewById(R.id.retrieve_location_button);
30         
31        locationManager = (LocationManager) getSystemService(Context.LOCATION_SERVICE);
32         
33        locationManager.requestLocationUpdates(
34                LocationManager.GPS_PROVIDER,
35                MINIMUM_TIME_BETWEEN_UPDATES,
36                MINIMUM_DISTANCE_CHANGE_FOR_UPDATES,
37                new MyLocationListener()
38        );
39         
40    retrieveLocationButton.setOnClickListener(new OnClickListener() {
41            @Override
42            public void onClick(View v) {
43                showCurrentLocation();
44            }
45    });       
46         
47    }   
48
49    protected void showCurrentLocation() {
50
51        Location location = locationManager.getLastKnownLocation(LocationManager.GPS_PROVIDER);
52
53        if (location != null) {
54            String message = String.format(
55                    "Current Location \n Longitude: %1$s \n Latitude: %2$s",
56                    location.getLongitude(), location.getLatitude()
57            );
58            Toast.makeText(LbsGeocodingActivity.this, message,
59                    Toast.LENGTH_LONG).show();
60        }
61
62    }  
63
64    private class MyLocationListener implements LocationListener {
65
66        public void onLocationChanged(Location location) {
67            String message = String.format(
68                    "New Location \n Longitude: %1$s \n Latitude: %2$s",
69                    location.getLongitude(), location.getLatitude()
70            );
71            Toast.makeText(LbsGeocodingActivity.this, message, Toast.LENGTH_LONG).show();
72        }
73
74        public void onStatusChanged(String s, int i, Bundle b) {
75            Toast.makeText(LbsGeocodingActivity.this, "Provider status changed",
76                    Toast.LENGTH_LONG).show();
77        }
78
79        public void onProviderDisabled(String s) {
80            Toast.makeText(LbsGeocodingActivity.this,
81                    "Provider disabled by the user. GPS turned off",
82                    Toast.LENGTH_LONG).show();
83        }
84
85        public void onProviderEnabled(String s) {
86            Toast.makeText(LbsGeocodingActivity.this,
87                    "Provider enabled by the user. GPS turned on",
88                    Toast.LENGTH_LONG).show();
89        }
90
91    }
92     
93}
For the LocationListener interface, we implemented the MyLocationListener inner class. The methods in that class just use Toasts to provide info about the GPS status or any location changes. The only interface element is a Button which gets hooked up with a OnClickListener and when it is clicked, the showCurrentLocation method is invoked. Then, the getLastKnownLocation of the LocationManager instance is executed returning the last known Location. From a Location object we can get information regarding the user’s altitude, latitude, longitude, speed etc. In order to be able to run the above code, the necessary permissions have to be granted. These are:
Include those in the AndroidManifest.xml file, which will be as follows:
01<?xml version="1.0" encoding="utf-8"?>
02
03<manifest xmlns:android="http://schemas.android.com/apk/res/android"
04      package="com.javacodegeeks.android.lbs"
05      android:versionCode="1"
06      android:versionName="1.0">
07       
08    <application android:icon="@drawable/icon" android:label="@string/app_name">
09        <activity android:name=".LbsGeocodingActivity"
10                  android:label="@string/app_name">
11            <intent-filter>
12                <action android:name="android.intent.action.MAIN" />
13                <category android:name="android.intent.category.LAUNCHER" />
14            </intent-filter>
15        </activity>
16
17    </application>
18     
19    <uses-permission android:name="android.permission.ACCESS_FINE_LOCATION" />
20 <uses-permission android:name="android.permission.ACCESS_MOCK_LOCATION" />
21 <uses-permission android:name="android.permission.ACCESS_COARSE_LOCATION" />
22     
23    <uses-sdk android:minSdkVersion="3" />
24
25</manifest>
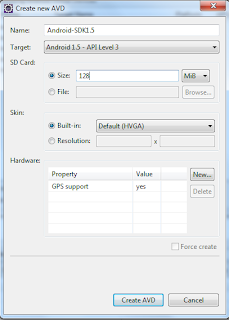
Next, use the AVD Manager in order to create a new Android device and make sure that GPS support is included in the features:
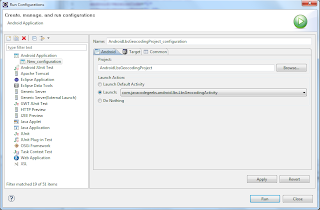
Next, use “Run–> Run Configurations…” to create a new configuration for the project:
If you hit Run, the emulator is started, but nothing will really happen when the button is clicked. That is because when the emulator starts, there is no last known location to be retrieved (the Location instance that is returned is null).
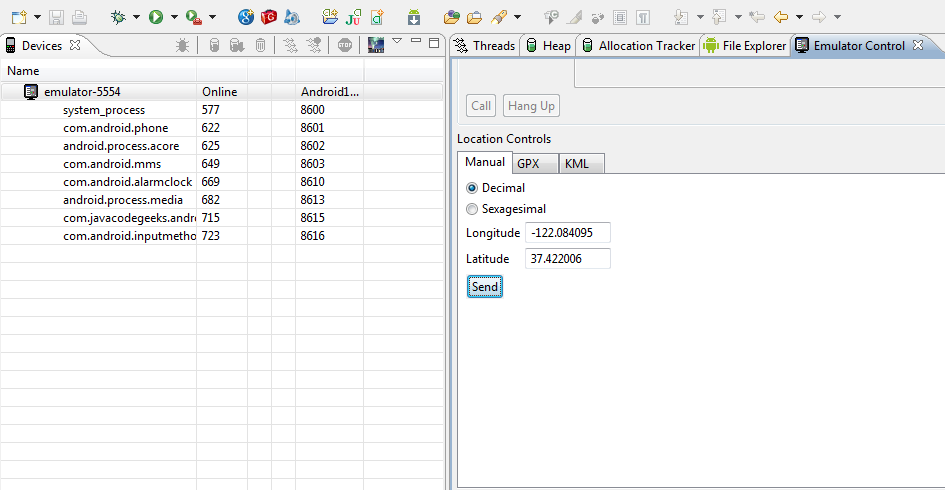
We have to feed the emulator with some dummy data. Go to the DDMS view of Eclipse and look for the “Emulation Control” tab. There, among other things, you will find the “Location Controls” section, which can send mock location data to the emulator. In the “Manual” tab, just hit the “Send” button, there are already some coordinates set up.
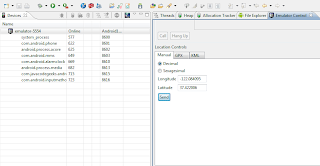
When the data are sent to the emulator’s GPS device, our listener will be triggered and the current location will be printed in the screen in the form of a Toast notification.
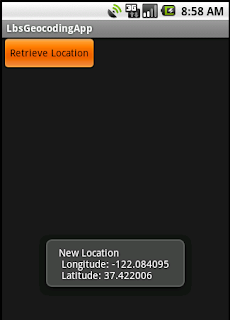
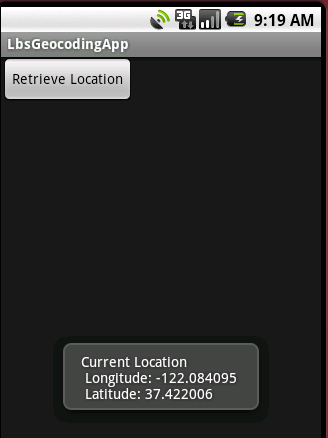
Now, a last known location exists, so if you hit the “Retrieve Location” button, a not null location will be fetched and the coordinates will again be printed in the screen:
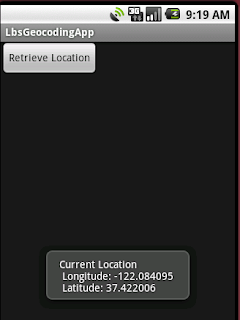
That’s it. Now you are able to emulate changes in the user’s location and retrieve updates about them. In the next tutorial, I will show you how to leverage those coordinates in order to provide useful data to the user. For now, you can find the Eclipse project here.
Happy coding!!!

source from: Nikos Maravitsas 

Tuesday, January 1, 2013

Android Hello World Example – How to develop android apps

In this tutorial, we will go through the necessary steps you need to take in order to develop your first Android application in Eclipse IDE using the ADT plugin and run it with an Android Virtual Device.
The ADT plugin provides easy Android Project creation and management with rich editor features and documentation as well as Android Virtual Device (AVD) management.


The steps :
  1. Download and Install the Android SDK
  2. Download and Install the ADT Eclipse plugin
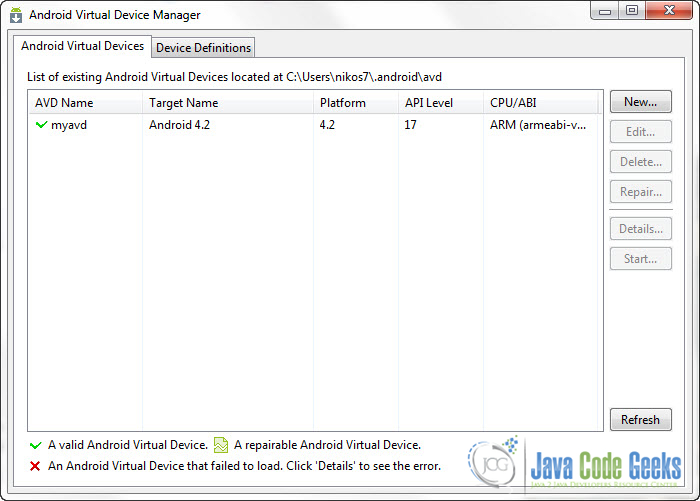
  3. Create an Android Virtual Device (AVD)
  4. Create an Android Project with Eclipse
  5. Run the Application in the Android Virtual Device
We will use the following tools in a Windows 64-bit platform:
  1. JDK 1.7
  2. Eclipse 4.2 Juno
  3. Android SKD 4.2

1. Download and Install the Android SDK

Go to the Android SDK page, and download the appropriate version for your platform. You can choose to download  the ADT (Android Development Tools) bundle, in which you will find both Eclipse and the Android SDK. But if you already have an Eclipse instance in your pc, click “USE AN EXISTING IDE” and Download the SDK Tools for your platform. This will download an installer to your system.

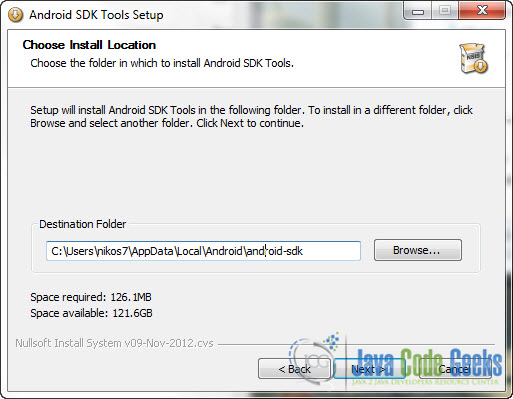
Run the installer and choose the SDK Path in which the SDK will be installed.

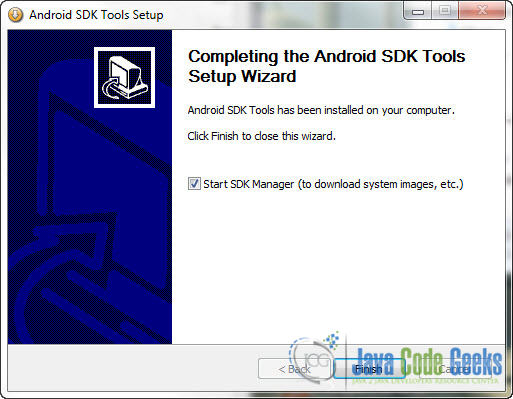
When the installation is finished, launch the Android SDK Manager.
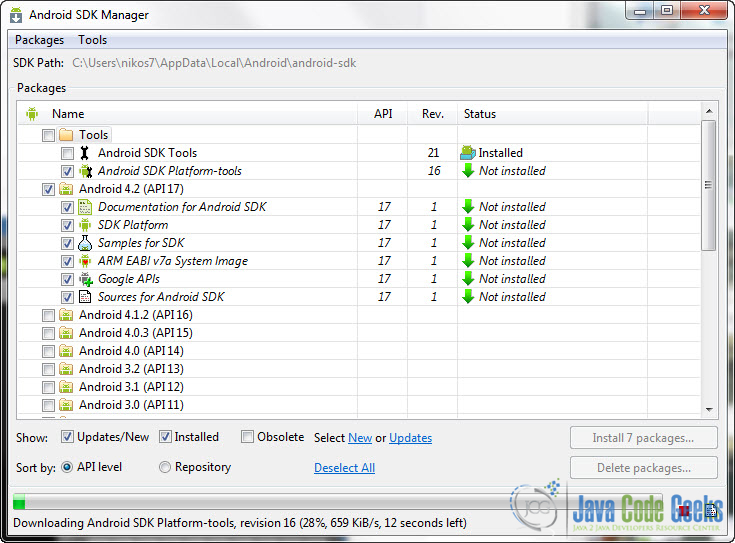
The Android SDK Manager will  install the Android Version you want to use and other tools and APIs as well. We are going to use Android 4.2.

2. Download and Install the ADT Eclipse plugin

In this step we are going to integrate Android SDK with Eclipse IDE, using the ADT (Android Development Tools) plugin.
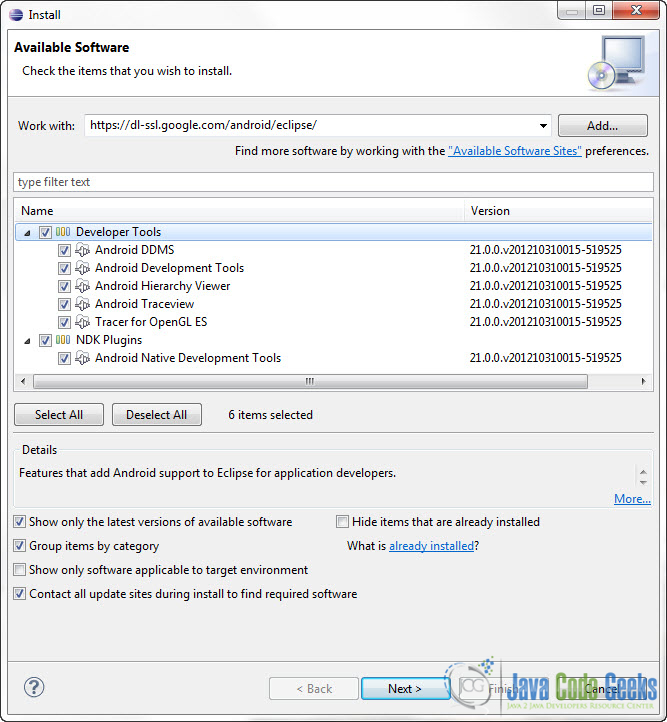
Open Eclipse and select Help -> Install New Software…, and in the first textfield put the following URL and click Add:

You may click Select All and Next to install the ADT. If you face any problems with the installation of the ADT plugin or if it is taking way to long to download and install, you can try installing the ADT manually and, of course you can follow the Troubleshooting Instructions.

3. Create an Android Virtual Device (AVD)

When you are done installing the ADT plugin you will be asked to restart the IDE. After restarting Eclipse, notice the two Android Development Tools Icons on the Eclipse Toolbar.

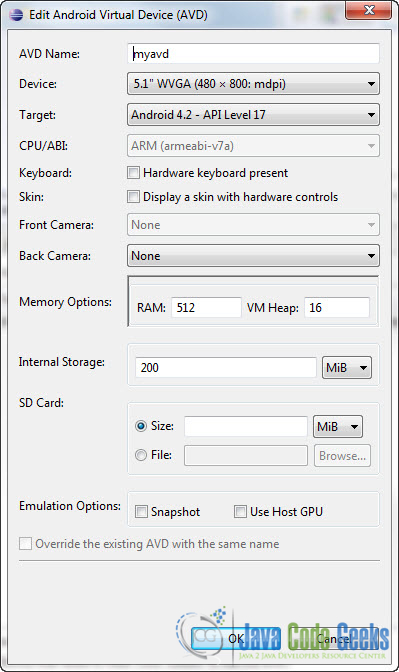
Using  these Icons you can instantly open the Android SDK Manager and setup  an Android Virtual Device (AVD) respectively. Click the right icon and in the pop up window click New to add a new Virtual Device.


4. Create an Android Project with Eclipse

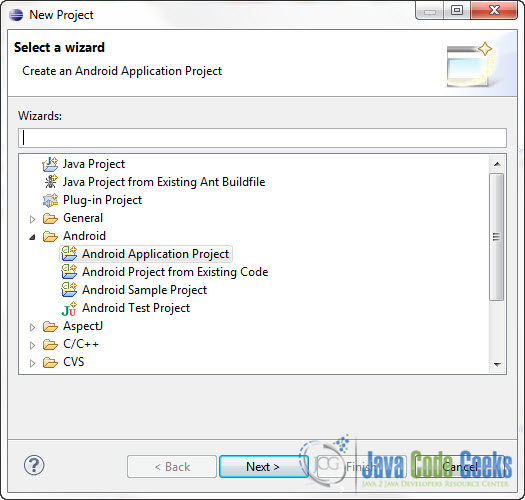
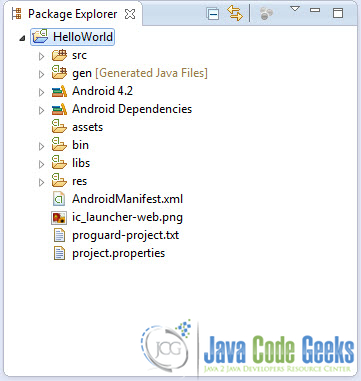
Now it’s time to create a new Android project. Select File -> New -> Project. Then select Android Application Project and click Next.

After specifying the Applications details (e.g. Application name) , go to the Project Explorer.

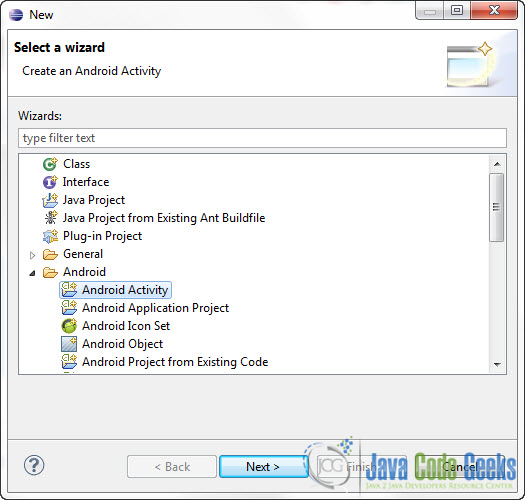
Right click on the project name (in this case “HelloWorld”…) and select New->Android Activity. If Android Activity doesn’t show up, select New->Other->Android->Android Activity.

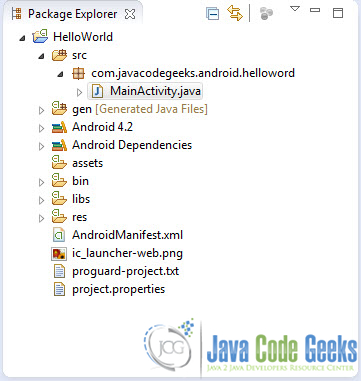
And click Next. You will be asked to specify some details about this Activity (e.g. name). Then, navigate to the java file which contains the source code of the new activity.

And paste the following code in the OnCreate method:
01package com.javacodegeeks.android.helloword;
02 
03import android.app.Activity;
04import android.os.Bundle;
05import android.widget.TextView;
06 
07public class MainActivity extends Activity {
08 
09    @Override
10    protected void onCreate(Bundle savedInstanceState) {
11        super.onCreate(savedInstanceState);
12 
13        TextView text = new TextView(this);
14        text.setText("Hello World of Android! - Greetings from Java Code Geeks");
15        setContentView(text);
16    }
17 
18}

5. Run the Application in the Android Virtual Device

You can now Run the project as Android Application. The emulator will be launched. This usually takes some time. So, when you are working on a Project, just launch the emulator once and leave it open.

Download Eclipse Project


Download the Eclipse Project of this tutorial HelloWorld.zip.

source from: Nikos Maravitsas
Thursday, June 7, 2012

How to install Windows XP on DV9500, DV6500 and DV2500 above model notebooks without using USB floppy drive.

How to install Windows XP on DV9500, DV6500,DV2500  and V3000 above model notebooks without using USB floppy drive.

If your notebook shipped with the Intel Processor and it is HP DV9500, DV6500 and DV2500 and above model notebooks. When you try to install XP on it using the XP operating system discs, mostly you will see the error that “Hard drive not found”. This issue occurs because the Operating system disc which you are using does not has the SATA drivers and all New HP notebooks shipped with the SATA hard drive. SATA is a technology which will be not supported by XP.

To resolve this issue and to install XP on your notebook, we need to install SATA drivers. This tutorial covers the process of installing Windows XP on an HP DV9500, DV6500 and DV2500 with Intel processor series Laptop. Currently, most HP Laptops are being shipped with Windows Vista, and there is minimal driver support on the HP website site for those who want to downgrade to Windows XP.

Generally we need USB floppy drive to install SATA driver on the above listed series notebooks but we can install SATA drivers with out using USB floppy drive.

To do this we are using nLite which will create a Windows XP installation disk with integrated SATA drivers. To do this we need a Optical drive which can burn discs. I would also recommend having a USB flash drive handy to hold the additional drivers that will be installed after XP installation.

Before proceeding to create a XP operating system disc with SATA drivers, I recommend to back up the important data from hard drive and create recovery discs for your notebook from recovery partition.

HP computers that ship with Microsoft Windows Vista do not come with recovery CDs. Instead, they use a space (partition) on the hard disk drive to store the recovery information. The use of a hidden partition provides a convenient process that eliminates the use of recovery discs that may be lost or scratched. Recovery discs for Windows Vista can be created by using the Recovery Manager or are available from HP for a minimal cost.

Here is the web link which has instructions to create recovery discs for your notebook using recovery manager software. Please follow the instruction and create recovery discs.

http://h10025.www1.hp.com/ewfrf/wc/genericDocument?lc=en&cc=us&dlc=en&docname=c00809678

Installation Procedure to f install Windows XP on a HP dv6500, dv9500, dv2500 series Laptop

First we need to "create a new Windows XP installation disk integrated with SATA drive controller drivers" (Intel SATA AHCI Controller Driver). Otherwise Windows XP will not find the hard disk during the installation procedure.

1. Download and install the nLite software from following web link.

http://www.nliteos.com/download.html

2. Download the Intel SATA AHCI Controller Driver from following ftp link and run the executable installing to the default c:\swsetup\SP37005 path (Note: After running the sp37005 file, it will ask you to insert a floppy, ignore the message and click on cancel)

ftp://ftp.hp.com/pub/softpaq/sp37001-37500/sp37005.exe

3. Insert your Windows XP CD into your CD drive

4. Navigate to Start -> Programs -> nLite and click nLite to launch the program

5. Once you get to the Locating the Windows installation section, Click the Browse button and navigate to the CD drive where your Windows install CD resides, then click OK and Next

6. Next, the program will ask you where to save the CD installation files for modification, click OK
7. Next, you will need to create a folder to save to and work from. Click the Make New Folder button, type in a folder name, and click OK

8. Next, nLite will attempt to copy all files from the Windows installation disk to the folder you have created. Once it has finished, click Next

9. Once you arrive at the Task Selection page, select the Drivers and Bootable ISO option and then click Next

10. Next to select the SATA drivers to integrate. Click Insert, select Single driver and navigate to the c:\swsetup\SP37005\Files and click iastor.inf and click Open

11. Next, select "ALL" of the driver files listed and then click OK .
12. Next, when prompted to start the process Click OK
13. After the process has finished, click Next till you arrive at the Bootable ISO page
14. I prefer to Create and ISO Image and then use other software to burn the ISO to a CD

Photobucket

15. Next, find your newly created ISO and burn your ISO to a CD using your preferred burning software
16. Insert the remastered Windows XP CD into your HP dv6500 series Laptop and proceed to install Windows XP

Wednesday, June 6, 2012

Samsung mobile tips, tricks& secrets

To check Samsung mobile or cellphones IMEI (International Mobile Equipment Identity)
On the main screen type *#06#

Information you get from the IMEI (International Mobile Equipment Identity)
    XXXXXX     XX     XXXXXX    X
        TAC      FAC       SNR     SP

TAC = Type approval code of your samsung Mobile
FAC = Final assembly code of your cellphone
SNR = Serial number of your samsung Phone
SP = Spare
Other secret tricks for samsung mobile or cellphone
  If you have downloaded corrupted or incompatible Java midlets or other media,
  which are causing problems with the phone, try this
  *2767*JAVA# Java Reset and (Deletes all Java Midlets)
  *2767*MEDIA# Reset Media (Deletes All Sounds and Pics)
  *2767*WAP# Wap Reset
  *2767*CUST# Reset Custom EEPR0M
  *2767*FULL# Reset Full EEPR0M (Caution)
  For example : *2767*JAVA# would be keyed in as *2767*5282#
  Note : Not all codes will work with SGH-C100.

  The master reset code is:
  #*7728#
  This will not delete anything from your
  mobile phone, but set each and eveything to its
  default/standard setting as it was on the time of purchase.

  To unlock your phone put a sim from another company,
  now type *#9998*3323# it will reset your phone. Push exit and then push 7,
  it will reset again. Put your other sim in and it will say sim lock,
  type in 00000000 then it should be unlocked. Type in *0141# then
  the green call batton and it's unlocked to all networks.
  This code may not work on the older phones and some of the newer phones.
  If it doesn't work you will have to reset your phone without a sim in it
  by typing *#2767*2878# or *#9998*3855# (not tested)

  Other Samsung Codes
  *#9998*4357# Help Menu
  *#9998*5282# Java menu (GRPS/CSD settings for JAVA server)
    *#9999#0# Monitor Mode
  *#9999# or *#9998*9999# Software Version
  *#8888# or *#9998*8888# Hardware Version
  *#9998*746# or *#9998*0746# or *#0746# Sim Infos
  *#9998*523# or *#9998*0523# or *#0523# Display Contrast
  *#9998*842# or *#9998*0842# or *#0842# Vibration On (until you push OK)
  *#9998*289# or *#9998*0289# or *#0289# Buzzer On (until you push OK)
  *#9998*288# or *#9998*0288# or *#0288# Battery & Field Infos
  *#9998*377# or *#9998*0377# Error log
  *#9998*778# or *#9998*0778# or *#0778# Sim Service table
  *#9998*782# show date and alarm clock
  *#8999*638# show network information
  *#9998*5646# change operator logo at startup
  *#9998*76# production number
  *#9998*968# view melody for alarm
  *#9998*585# Non-Volatile Memory (NVM)
  *#3243948# Digital Audio Interference Off
  *#32436837# Digital Audio Interference On

SECRET PRANK
Change closed caller group (settings >security settings>user groups) to 00000 and your phone will sound the message tone when you are near a radar speed trap.
Setting it to 500 will cause your phone 2 set off security alarms at shop exits.
Try this secret trick if you can handle the unexpected.
Note: This secret trick wont work with all phones Models.
THE DETECTIVE TRICK (Mobile Spying)
  Now you can spy on anyone using your cellphone. Just do the following.
  1. Activate the "Automatic Answer" in the headset profile of your cellphone and set the ringing volume to "Mute"
  2. Short-circuit the left middle and right pins on the bottom of the mobile phone with all connections touching each other this will activate profile "Headset".
    If you cant do this just keep your earphone connected to mobile.
  3. Now place it under a table in a room and call it. Now you can use your phone for checking out what people are talking about in a room. Just call on your phone.
  4. The phone receives the call without ringing and you can listen to what people are saying.

Tuesday, June 5, 2012

Upgrade Samsung Galaxy S2 to official Android 4.0.3 XXLPQ firmware manually

An official Ice Cream Sandwich update from Samsung has finally landed for Galaxy S2 users in the Poland through Samsung KIES. Some features appear to be missing from earlier leaks, such as no 3D animation effect in drawer and while swiping home screens.
Apart from that, firmware XXLPQ brings some improvements as well, with no touch lags and packed with TouchWiz 4 UI. If for some reason Ice Cream Sandwich has not yet arrived on your device and you don’t want to miss out on the fun, we’ll be showing you how you, too, can enjoy XXLPQ, the official Ice Cream Sandwich release, on your Galaxy S2.
We’ll be installing this firmware through Odin3. If you’re an Android novice, you have no reason to fear. The upgrade process is easy as long as you follow our guide below.
This update is only for the Galaxy S2, with the model number GT-I9100, and is not compatible with other devices. You may check your device’s model number through “Settings > About Phone.” If your phone does not match the model number, we highly discourage attempting to install this firmware update as it may lead to bricking.

Caution

Though this leaked firmware is originally intended for Poland, some users of the Samsung Galaxy S2 GT-I9100 have reported that this firmware work on Polish, Hungarian, Swedish, German, Pakistani, Korean, and European handsets, too.
But, still, you are advised to proceed with the update at your own risk.  Any damage you cause to your phone or to yourself will be your sole responsibility.

Requirements

Take note of the following and comply with the requirements before updating:
  • Flashing this firmware update will wipe your data. Make sure to create a backup of any important data on your Galaxy S2.
  • Make sure to charge your Galaxy S2′s battery (at least 70%, full charge recommended). This prevents your Galaxy S2 from shutting off in the middle of the update process.
  • If you’ve got Samsung KIES installed on your computer, uninstall it as it may interrupt the update process.
  • A Windows PC
  • Download Odin3 v1.83 to your computer.
  • Make sure that you’ve got the device drivers for your phone installed on your Windows computer.  32 bit (x86) Windows | 63 bit (x64) Windows.
  • XXLPQ firmware — Download from here or here.

Update Instructions

These are the steps for applying the firmware update manually:
  1. Download the XXLPQ firmware to your computer.
  2. Extract the “I9100XXLPQ_I9100OXALPQ_I9100XXLPQ_HOME.tar.md5″ file using 7-Zip or WinRAR.
  3. Turn off your Galaxy S2.  Wait for the phone to vibrate, signalling that it is completely powered down.
  4. Reboot your phone into Download Mode. You can do this by pressing and holding down the Volume Down, Home, and Power buttons until you get the Warning! message on the screen.  Press the Volume Up button to enter download mode.
  5. On your computer, run Odin3.
  6. Connect your Galaxy S2 to your computer via USB cable.  The message box in Odin3 will say “Added!” if the program successfully detected your phone.
  7. In Odin3, click the PDA tab, navigate to where you extracted the contents of the XXLPQ firmware and select the “I9100XXLPQ_I9100OXALPQ_I9100XXLPQ_HOME.tar.md5″ file.
  8. Check both the Auto Reboot and F. Reset Time checkboxes in the Option section.  Leave everything else as is.
  9. Hit START to begin installing the XXLPQ firmware.
  10. Once the installation has completed, you should see the upper-left square in the Odin window light up in green with a “PASS!” message.
  11. If Odin gets stuck in the middle of the installation process, you’ll need to do the following:
    1. Disconnect the Galaxy S2 from the computer.
    2. Close Odin.
    3. Remove the Galaxy S2′s battery.
    4. Re-insert it.
    5. Boot phone back into Download mode.
    6. Resume the procedure from step 6.
  12. Your phone should now reboot.
  13. After the firmware has installed and the phone reboots, some users have reported getting stuck at the S logo. If this happens, do the following:
    1. Boot to recovery mode. Power off the phone. Wait for a few seconds and then press the Home, Volume Up, and Power buttons together.
    2. Select “Wipe Data/Factory Reset.”
    3. Select “Wipe Cache.”
    4. Select “Reboot System Now.”
Congratulations! Your Samsung Galaxy S2 is now running on Ice Cream Sandwich with XXLPQ firmware.

Hacking Software - oclHashcat-plus v0.08


What is oclHashcat-plus v0.08 ? oclHashcat-plus v0.08 worlds first ''GPU" based rule engine.It is also the worlds fastest phpass, mscash2,md5crypt and WPA/WPA2 cracker.

Description - oclHashcat-plus v0.08 ius an advanced password hacking software which is highly efficient and works faster than any other software of it's genre.There are a number of algorithms implemented in it and it has many features which make it the best software available for password cracker.

Some of it's Features 

1.Multi-GPU (up to 16 gpus)

2.Multi-Hash (up to 24 million hashes)

3.Multi-OS (Linux & Windows native binaries)

4.Multi-Platform (OpenCL & CUDA support)

5.Supports reading words from file.

6.Supports reading words from stdin

7.Integrated thermal watchdog And many more..

Algorithms implemented - 

1.Joomla.
2.MD5.
3.Oracle 11g.
4.MSSQL - 2000.
5.MSSQl -2005.
6.MySQl.
7.Phpass.
8.Oracle 7-10g.
9.SHA256.
10.NTLM.
11.MD4.
12.OSX10.7.
13.CISCO-PIX MD5.
14.Double MD5.
15.SSHA.
16.SHA-1(Base64), nsldap, Netscape LDAP SHA.
17.SSHA-1(Base64), nsldaps, Netscape LDAP.
18.DCC,mscash.
19.OSX v10.4, v10.5, v10.6.
20.SHA1.

Modes of Attack- 

1.Straight
2.Combination
3.Brute-force
4.Permutation
5.Hybrid dict + mask
6.Hybrid mask + dict


Cracking a WPA handshake with OclHashcat-Plus(Video)


About The Author

This article is written by Shikhil Sharma, He blogs at www.hacking-tweaks.blogspot.com/.