Wednesday, November 27, 2013

Send WhatsApp messages via PHP using WhatsAPI


I recently discovered that once you have acquired your WhatsApp account password, it’s relatively easy to send and receive WhatsApp messages via PHP. Using the PHP-based framework WhatsAPI, a simple WhatsApp notifier script only has a dozen lines of code.
This tiny tutorial shows how to use the two very basic functions of WhatsAPI, namely to send simple outgoing messages to any number and to listen for new incoming messages from your own WhatsApp account. This is the second part of a two-part tutorial. The first part demonstrated how to sniff the WhatsApp password from your Android phone or iPhone.


1. Get your WhatsApp password

This little demonstration only works if you have already obtained your WhatsApp password. If you have not and have no idea how to do it, please check out the first part of this tutorial.

2. Get WhatsAPI and send/receive messages

Assuming you have your WhatsApp password at hand, let’s see how easy the usage of WhatsAPI is.

2.1. Download WhatsAPI and test scripts

Downloading WhatsAPI is really simply since it is hosted on Github. Simply make a new directory and retrieve WhatsAPI from Github.
Once you have done that, you can check out the current structure of the project. There is also a file called EXAMPLES.php that shows a few more examples.
I also prepared a few small scripts that you can use as a basis to make your own scripts:
To download my two minimal examples, run the following commands, and edit the file whatsapp_whatsapi_config.php to set your own user credentials:

2.2. Send WhatsApp messages

As you might know from your smartphone client, you can send different kind of messages through WhatsApp: Besides text, you can send audio and video files, locations and contacts. WhatsAPI can do all of those things in just one line of code.
My simple sample script whatsapp_whatsapi_send.php just shows how to send a regular text message. The script is meant to be called by the command line, but the code can also be used in a web application:
The script includes the configuration for your WhatsApp username, password and display name. It’s very easy to use and quite self-explanatory: The WhatsProt class is the only thing you need. Simple Connect to the WhatsApp servers and LoginWithPassword to authenticate yourself. After that, you can use the following methods:
  • Message($to, $msg): Simply send a regular text message to $to.
  • MessageImage($to, $imageURI): Send images by URL or local path (jpg) to $to.
  • MessageVideo($to, $videoURI): Send videos by URL or local path (mp4) to $to.
  • MessageAudio($to, $audioURI): Send audios by URL or local path (mp3) to $to.
  • Location($to, $lng, $lat): Send GPS coordinates to $to
  • vCard($to, $vCardName, $vCard): Send a vCard to $to.
  • WaitForReceipt(): Wait for the WhatsApp servers to confirm the delivery.
The tiny script from above obviously only sends plain text messages. You can use it from the command line like this:
The script is particularly useful as a WhatsApp notifier, allowing you to receive notifications from your servers whenever you want — for example, if the CPU temperature rises above a certain threshold, the load is too high for a certain amount of time or one of your scripts failed/succeeded. This is particularly interesting in combination with a system monitoring service such as Nagios or Monit.

2.3. Receive WhatsApp messages

To be able to receive WhatsApp messages using PHP, you need to listen for new messages. WhatsAPI’s PollMessages does exactly that. It reads messages from the WhatsApp server socket and puts them in a local queue for processing. The method blocks if there are no messages and waits for the server to send a message indefinitely — just like any other server does. Using GetMessages you can pull the messages from the queue and process them in your application.
A minimal script would look very similar to the example from above, except that instead of calling Message(), you need to call PollMessages() and GetMessages() in a server loop:
Each WhatsApp message has a set of standard attributes ($m->_attributeHash) such as from (sender number) or t (send timestamp). Additionally, it has different kind of child nodes that contain additional/optional information, depending on what type of message it is: a notify child node, for instance, tells the conversation partner that he or she is online and still writing, and the body child node contains the text contents. There are many more of these. You can see for yourself by calling print_r($msgs).
The following snippet shows an excerpt of one message — refer to this example output to see more:
My example server script whatsapp_whatsapi_listen.php extends the above snippet and processes the messages like this: It takes the time (t) and sender number (from) from $m->_attributeHash and the name and _data from the child nodes. Each non-empty message is printed to STDOUT, like this:
If the message body is “exit”, the script exits.

That’s it. I hope this tutorial helped a little in understanding how WhatsAPI works. If you have any suggestions or questions, please let me know in the comments.

source from  http://blog.philippheckel.com

Sunday, November 10, 2013

HACK- Candy Crush Saga v1.xx.0 (Multi Mods) – Android


This hack is for Candy Crush Saga  on android devices. This hack uses the Install Hacked APK method.


Hack Features:
Many different depending on file.

Instructions:
  1. Download the zip file provided at the bottom of the page.
  2. Extract the file.
  3. Transfer the APK file onto your device (preferably SD card in /sdcard/download/)
  4. Use a file explorer to navigate to the location of the saved APK (Should be /sdcard/download/)
  5. Click the APK and select install.
  6. Launch the game.
  7. Enjoy
NOTE! If you are having Facebook connections follow the instructions below:
  1. Uninstall original Candy Crush.
  2. Go into your Facebook account settings.
  3. Go to your app settings
  4. Remove Candy Crush
  5. Install modded APK
  6. Launch game and connect to Facebook

Hack:

Candy Crush Saga v1.28.0


source from: http://www.ugeeko.com/

Tuesday, March 5, 2013

Android Location Based Services Application – GPS location

With the incorporation of GPS devices in smartphones, Location Based Services (LBS) have become pretty hot the past few years. The iPhone was the first to give a huge boost to this kind of applications and now Android continues on the same path. In this tutorial, I will show you how to build your first LBS application for Android. The first step is retrieving the user’s current location and then using his coordinates to provide data for that location.
In general, the user’s pinpointing on the map is feasible in one of the following ways:
  1. Using the GPS device that comes with the mobile
  2. Using the ID of the Cell that the user is currently served by
The first one is much easier and more accurate (since the second provides only an approximation). Since these days a big number of phones do have GPS devices onboard, we will use the first way. The Android SDK’s emulator can emulate changes in the user’s location and provide dummy data for his coordinates.
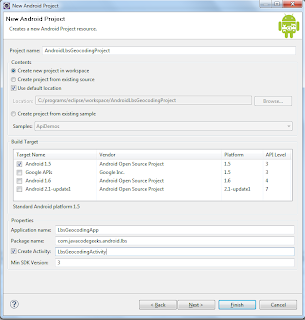
Let’s get started by creating a new Android Project in Eclipse. I gave it the fancy name “AndroidLbsGeocodingProject” and used the properties as shown in the following image:

Note that I used the Android 1.5 platform version and “3” as the SDK’s min version. The application is not going to use any of the new super-duper APIs, so I decided to go with one of the first versions for backwards compatibility. It is generally a good idea to support as many versions as possible. You can find information regarding the platform versions and their corresponding market share here.
To start with, we will only add a button which will trigger the retrieval of the current location’s coordinates from a location provider. Thus, the “main.xml” file for the application’s interface will be as simple as this:
01<?xml version="1.0" encoding="utf-8"?>
02<LinearLayout xmlns:android="http://schemas.android.com/apk/res/android"
03    android:orientation="vertical"
04    android:layout_width="fill_parent"
05    android:layout_height="fill_parent"
06    >
07<Button
08 android:id="@+id/retrieve_location_button"
09 android:text="Retrieve Location"
10 android:layout_width="wrap_content"
11 android:layout_height="wrap_content"
12 />
13</LinearLayout>
In order to get started with the location capabilities of the Android API, the first step is to take reference of the LocationManager class, which provides access to the system location services. This is done via the getSystemService of our activity (actually it inherits it from the Context parent class). Then, we request updates of the device’s location using the method requestLocationUpdates. In that method, we provide the name of the preferred location provider (in our case GPS), the minimum time interval for notifications (in milliseconds), the minimum distance interval for notifications (in meters) and finally a class implementing the LocationListener interface. That interface declares methods for handling changes in the user’s location as well as changes in the location provider’s status. All the above can be translated into code as below:
01package com.javacodegeeks.android.lbs;
02
03import android.app.Activity;
04import android.content.Context;
05import android.location.Location;
06import android.location.LocationListener;
07import android.location.LocationManager;
08import android.os.Bundle;
09import android.view.View;
10import android.view.View.OnClickListener;
11import android.widget.Button;
12import android.widget.Toast;
13
14public class LbsGeocodingActivity extends Activity {
15     
16    private static final long MINIMUM_DISTANCE_CHANGE_FOR_UPDATES = 1; // in Meters
17    private static final long MINIMUM_TIME_BETWEEN_UPDATES = 1000; // in Milliseconds
18     
19    protected LocationManager locationManager;
20     
21    protected Button retrieveLocationButton;
22     
23    @Override
24    public void onCreate(Bundle savedInstanceState) {
25         
26        super.onCreate(savedInstanceState);
27        setContentView(R.layout.main);
28
29        retrieveLocationButton = (Button) findViewById(R.id.retrieve_location_button);
30         
31        locationManager = (LocationManager) getSystemService(Context.LOCATION_SERVICE);
32         
33        locationManager.requestLocationUpdates(
34                LocationManager.GPS_PROVIDER,
35                MINIMUM_TIME_BETWEEN_UPDATES,
36                MINIMUM_DISTANCE_CHANGE_FOR_UPDATES,
37                new MyLocationListener()
38        );
39         
40    retrieveLocationButton.setOnClickListener(new OnClickListener() {
41            @Override
42            public void onClick(View v) {
43                showCurrentLocation();
44            }
45    });       
46         
47    }   
48
49    protected void showCurrentLocation() {
50
51        Location location = locationManager.getLastKnownLocation(LocationManager.GPS_PROVIDER);
52
53        if (location != null) {
54            String message = String.format(
55                    "Current Location \n Longitude: %1$s \n Latitude: %2$s",
56                    location.getLongitude(), location.getLatitude()
57            );
58            Toast.makeText(LbsGeocodingActivity.this, message,
59                    Toast.LENGTH_LONG).show();
60        }
61
62    }  
63
64    private class MyLocationListener implements LocationListener {
65
66        public void onLocationChanged(Location location) {
67            String message = String.format(
68                    "New Location \n Longitude: %1$s \n Latitude: %2$s",
69                    location.getLongitude(), location.getLatitude()
70            );
71            Toast.makeText(LbsGeocodingActivity.this, message, Toast.LENGTH_LONG).show();
72        }
73
74        public void onStatusChanged(String s, int i, Bundle b) {
75            Toast.makeText(LbsGeocodingActivity.this, "Provider status changed",
76                    Toast.LENGTH_LONG).show();
77        }
78
79        public void onProviderDisabled(String s) {
80            Toast.makeText(LbsGeocodingActivity.this,
81                    "Provider disabled by the user. GPS turned off",
82                    Toast.LENGTH_LONG).show();
83        }
84
85        public void onProviderEnabled(String s) {
86            Toast.makeText(LbsGeocodingActivity.this,
87                    "Provider enabled by the user. GPS turned on",
88                    Toast.LENGTH_LONG).show();
89        }
90
91    }
92     
93}
For the LocationListener interface, we implemented the MyLocationListener inner class. The methods in that class just use Toasts to provide info about the GPS status or any location changes. The only interface element is a Button which gets hooked up with a OnClickListener and when it is clicked, the showCurrentLocation method is invoked. Then, the getLastKnownLocation of the LocationManager instance is executed returning the last known Location. From a Location object we can get information regarding the user’s altitude, latitude, longitude, speed etc. In order to be able to run the above code, the necessary permissions have to be granted. These are:
Include those in the AndroidManifest.xml file, which will be as follows:
01<?xml version="1.0" encoding="utf-8"?>
02
03<manifest xmlns:android="http://schemas.android.com/apk/res/android"
04      package="com.javacodegeeks.android.lbs"
05      android:versionCode="1"
06      android:versionName="1.0">
07       
08    <application android:icon="@drawable/icon" android:label="@string/app_name">
09        <activity android:name=".LbsGeocodingActivity"
10                  android:label="@string/app_name">
11            <intent-filter>
12                <action android:name="android.intent.action.MAIN" />
13                <category android:name="android.intent.category.LAUNCHER" />
14            </intent-filter>
15        </activity>
16
17    </application>
18     
19    <uses-permission android:name="android.permission.ACCESS_FINE_LOCATION" />
20 <uses-permission android:name="android.permission.ACCESS_MOCK_LOCATION" />
21 <uses-permission android:name="android.permission.ACCESS_COARSE_LOCATION" />
22     
23    <uses-sdk android:minSdkVersion="3" />
24
25</manifest>
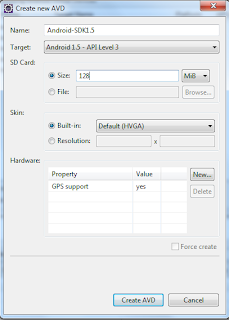
Next, use the AVD Manager in order to create a new Android device and make sure that GPS support is included in the features:

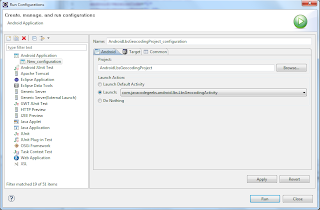
Next, use “Run–> Run Configurations…” to create a new configuration for the project:

If you hit Run, the emulator is started, but nothing will really happen when the button is clicked. That is because when the emulator starts, there is no last known location to be retrieved (the Location instance that is returned is null).
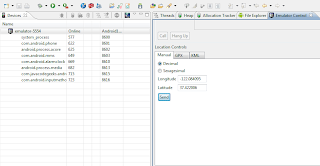
We have to feed the emulator with some dummy data. Go to the DDMS view of Eclipse and look for the “Emulation Control” tab. There, among other things, you will find the “Location Controls” section, which can send mock location data to the emulator. In the “Manual” tab, just hit the “Send” button, there are already some coordinates set up.

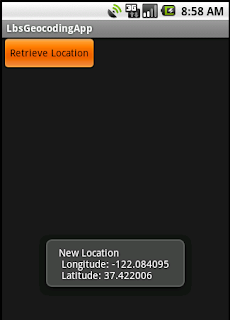
When the data are sent to the emulator’s GPS device, our listener will be triggered and the current location will be printed in the screen in the form of a Toast notification.

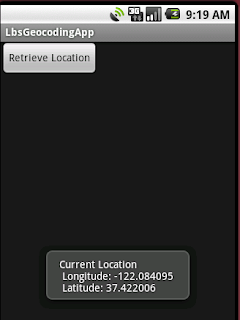
Now, a last known location exists, so if you hit the “Retrieve Location” button, a not null location will be fetched and the coordinates will again be printed in the screen:

That’s it. Now you are able to emulate changes in the user’s location and retrieve updates about them. In the next tutorial, I will show you how to leverage those coordinates in order to provide useful data to the user. For now, you can find the Eclipse project here.
Happy coding!!!

source from: Nikos Maravitsas 

Tuesday, January 1, 2013

Android Hello World Example – How to develop android apps

In this tutorial, we will go through the necessary steps you need to take in order to develop your first Android application in Eclipse IDE using the ADT plugin and run it with an Android Virtual Device.
The ADT plugin provides easy Android Project creation and management with rich editor features and documentation as well as Android Virtual Device (AVD) management.


The steps :
  1. Download and Install the Android SDK
  2. Download and Install the ADT Eclipse plugin
  3. Create an Android Virtual Device (AVD)
  4. Create an Android Project with Eclipse
  5. Run the Application in the Android Virtual Device
We will use the following tools in a Windows 64-bit platform:
  1. JDK 1.7
  2. Eclipse 4.2 Juno
  3. Android SKD 4.2

1. Download and Install the Android SDK

Go to the Android SDK page, and download the appropriate version for your platform. You can choose to download  the ADT (Android Development Tools) bundle, in which you will find both Eclipse and the Android SDK. But if you already have an Eclipse instance in your pc, click “USE AN EXISTING IDE” and Download the SDK Tools for your platform. This will download an installer to your system.

Run the installer and choose the SDK Path in which the SDK will be installed.

When the installation is finished, launch the Android SDK Manager.
The Android SDK Manager will  install the Android Version you want to use and other tools and APIs as well. We are going to use Android 4.2.

2. Download and Install the ADT Eclipse plugin

In this step we are going to integrate Android SDK with Eclipse IDE, using the ADT (Android Development Tools) plugin.
Open Eclipse and select Help -> Install New Software…, and in the first textfield put the following URL and click Add:

You may click Select All and Next to install the ADT. If you face any problems with the installation of the ADT plugin or if it is taking way to long to download and install, you can try installing the ADT manually and, of course you can follow the Troubleshooting Instructions.

3. Create an Android Virtual Device (AVD)

When you are done installing the ADT plugin you will be asked to restart the IDE. After restarting Eclipse, notice the two Android Development Tools Icons on the Eclipse Toolbar.

Using  these Icons you can instantly open the Android SDK Manager and setup  an Android Virtual Device (AVD) respectively. Click the right icon and in the pop up window click New to add a new Virtual Device.


4. Create an Android Project with Eclipse

Now it’s time to create a new Android project. Select File -> New -> Project. Then select Android Application Project and click Next.

After specifying the Applications details (e.g. Application name) , go to the Project Explorer.

Right click on the project name (in this case “HelloWorld”…) and select New->Android Activity. If Android Activity doesn’t show up, select New->Other->Android->Android Activity.

And click Next. You will be asked to specify some details about this Activity (e.g. name). Then, navigate to the java file which contains the source code of the new activity.

And paste the following code in the OnCreate method:
01package com.javacodegeeks.android.helloword;
02 
03import android.app.Activity;
04import android.os.Bundle;
05import android.widget.TextView;
06 
07public class MainActivity extends Activity {
08 
09    @Override
10    protected void onCreate(Bundle savedInstanceState) {
11        super.onCreate(savedInstanceState);
12 
13        TextView text = new TextView(this);
14        text.setText("Hello World of Android! - Greetings from Java Code Geeks");
15        setContentView(text);
16    }
17 
18}

5. Run the Application in the Android Virtual Device

You can now Run the project as Android Application. The emulator will be launched. This usually takes some time. So, when you are working on a Project, just launch the emulator once and leave it open.

Download Eclipse Project


Download the Eclipse Project of this tutorial HelloWorld.zip.

source from: Nikos Maravitsas